"The bulkheads are rotten" is what the surveyor said - softly - dropping a bomb at the end of the day, just minutes from when Becca and I were to get on the road back home. We had made a day trip to Manitowoc for the survey and sea trial of the soon-to-be-our boat, and everything had seemed to go ok. Sure, the boat had LOTS of issues we already knew about upfront, but we were ready to deal with those. And yes, the engines didn't reach their recommended RPMs during the sea trial just a couple hours earlier, but we had already been doing the mental gymnastics to get over the issue, adjust our offer, and move forward with the purchase. This bombshell news flushed all our optimism down the head, and made for a gloomy 5-hour drive home.
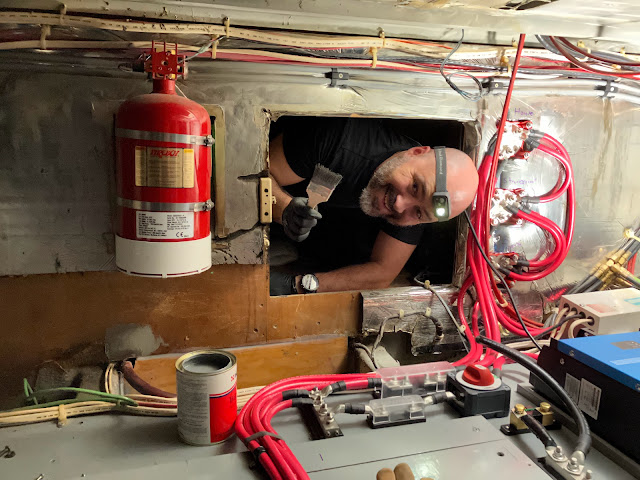
Firstly, for our readers who are less hip to boat lingo,... Bulkheads are the "walls" that run across the hull, perpendicular to the stringers (the "beams" that run the length of a boat). Bulkheads provide dimensional stability and often help to stabilize the hull from excessive deflection. Rotted bulkheads can spell doom for old boats, as access to them can be very difficult and - depending on the extent of the rot - it may not make financial sense to repair them. For reference: here I am, looking into the engine room through an access panel in the forward engine room bulkhead (spoiler, the brighter wood panel seen towards the middle bottom is one of our rebuilt bulkheads!):
We had made our offer contingent upon a successful survey and sea trial, and had told ourselves that we would walk away if any major issues came up. Now we had TWO potentially major issues at hand, and we knew that the prudent course of action, what 99% of buyers would do at this point, would be to walk. And yet, as you know, we didn't! After all, here we are! After the surveyor returned again to investigate further, there was a slew of communications between him, us, and Manitowoc Marina's service department, to see what was possible. It was determined, based on their construction, that the "bulkheads" in question were really "dividers" for the engine room, but that they were not primary structural elements. The affected area was was also relatively small, and fixable. So, we adjusted our offer and bought the boat anyway, expecting that the marina could do the bulkhead repair over the winter. Well, it didn't quite work out that way.
There were two sections of bulkhead that needed replacement: the panels between the main stringers that separate the engine room from the bilge area under the cabins - one at the front and one at the back. Of course, being a boat, each of them had significant access issues. Once we owned the boat, we wanted this fixed ASAP, but it wasn't to be. The marina quoted us a couple of thousand dollars "just to get access" to the rear bulkhead - suggesting that a large 2'x2' hole be cut on the aft cabin floor. After that, they would estimate the actual repair. I decided to investigate more. Surprisingly, it took me maybe an hour to not only identify the extent of the problem areas but to also cut away the rotted wood (a pretty small area in the end). At this point, I told them we'd handle the rear bulkhead ourselves. Below, on the right, you can see where I cut the wood at the top of the image, the tan material on the perimeter is the old fiberglass tabbing, and in black you see the backside of the engine room insulation.
We still hoped they would do the forward bulkhead, but that one needed the generator moved for access, before they could estimate the repair. Well, they couldn't get to removing our generator until it was too late for them to help us with the repair, as winter was gone and they were already launching boats. So, in the end, it was all up to us!
In many ways, the repairs turned out to be easier than expected, and it's always rewarding to learn new things and tackle projects that seemed - at first - beyond your abilities. If access to the area had been easy, I would say this could almost have been a piece of cake. But still, new skills had to be learned, and most of the work would have to be done in difficult positions.
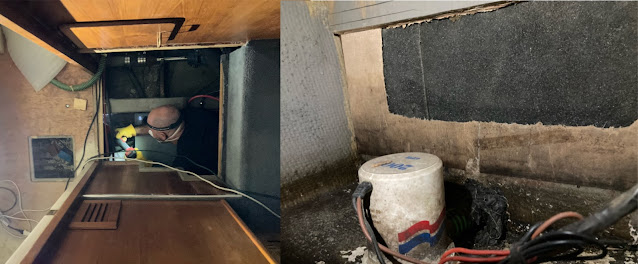
The hardest part may have been the prepping: gaining access to the area, especially the forward bulkhead where many pieces of equipment had to be moved, and - of course - the cleaning. The reason the bulkheads had rotten was that many inches of standing water had been left there for extended periods of time, which had also left a thick goo that covered everything. Below, images of how intimidating the access to the forward bulkhead seemed (left, can't hardly see it!), how bad it was (top right), and the bulkhead cut out and the cleaning in progress.
Becca and I teamed up for this... It was the kind of job that would challenge the gumption of anyone doing it by themselves! It took lots of vacuuming, scrubbing, sanding, and wiping... but we got the area clean enough for the repair, if not quite pristine. A little belt sander action:
Then, we had to build the bulkheads. I did those in the comfort of our garage, while standing up! What luxury! I bought some marine plywood and an epoxy kit from Totalboat, and put a thin layer of glass on both sides of the wood. The original one was bare wood, so I did this for additional moisture protection.
The installation part was the easiest, other than the contorting. It helped that I had a friend who had some fiberglass experience help me with the first one. It's always much easier to tackle something if you've seen it done once! Totalboat also has instructional videos that proved to be very helpful.
I wanted these bulkheads to be sealed to the hull, so as not to have the bottom edge exposed to bilge water, like the original ones were. (The original ones were only tabbed to the hull on one side, and the cut edge was exposed on the other). So we cut the bulkheads to the shape of the hull, and used a thickened epoxy to bond them to the hull and stringers. I used the opportunity to pre-drill a couple of the holes that would need to go in the rear bulkhead, one for a bilge pump hose and the other for the transducer cable. I've quickly become a "tool person," because having the right tools really make any job easier. And this job was made easier by some of the tools recently added to my Milwaukee cordless kit... In this case the little M12 jigsaw, which made quick work of the bulkhead cut, the M12 caulk gun, which pushes the thickened epoxy with ease, and the set of "Hole Dozer" hole saw bits - which we've come to refer to as the "Holinator" bits in our house... after Becca mis-remembered the clever branding and accidentally improved it.

While we are no fiberglass experts, and are not about to do a YouTube instructional video based on our first experience, I have to say that one trick in particular made our second bulkhead installation a breeze... That was, to pull a string out where you are making your cuts. It allows for perfectly straight cuts and pieces of consistent width, but more importantly, makes it so you don't have to deal with millions of loose fabric strands sticking to everything and making a mess. Plus, it's clearly satisfying:
Becca cut all the cloth pieces and sanded the bulkhead before install, and then it was just a matter of carefully "tabbing" the bulkhead to the hull and stringers, using layers of increasingly wider bands of cloth. I found the epoxy roller that I bought from Totalboat particularly useful in pushing out air bubbles without pulling on - and displacing - the fabric.
Bulkheads in place, we have now painted one of them and are in the process of installing equipment and hoses on, through, and around them. Below is the rear bulkhead prior to painting. Also, a video showing our new bilge pump hoses, all the way from new stainless steel thru-hulls to the brand new bilge pumps on either side of the re-built forward bulkhead (painted grey).
And, "just like that" we are past the most concerning issue from the survey, one that at first seemed quite daunting to even imagine how to tackle. If you had told us a few years ago, even last year, that we would be tackling this type of repair ourselves, we would have said "no way!" Which, in the end, makes the whole thing quite rewarding, regardless of the challenges and moments of doubt along the way.


Comments
Post a Comment